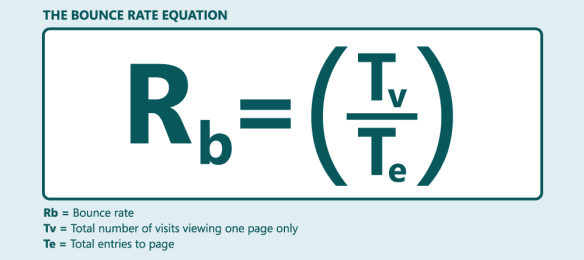
Bounce Rate is a measure of the percentage of single-page visits to the total visits on your website.
Let’s say that you are looking at the organic traffic of your site. You find that Bing has a 65% Bounce Rate. It means that 65% of traffic (visitors) coming to your site are browsing only a single page on your website and leaving.
Your visitors may have closed the browser abruptly, or typed a different URL on the address bar on their browser, or simply clicked on one of your social media sites or external blog and sites.
Is High Bounce Rate Bad For Business?
High Bounce Rate may not always indicate that a visitor did not find the content relevant and interesting, or it did not satisfied their drive to click-through the referring link.
Your visitors may land on a web page or a blog posts on your website and find a very relevant and interesting content they were looking after. The blog posts may have all the answers they were seeking; yet still they may not be interested to read everything on the web page and leave after few minutes or few seconds.
On the other hand, a low bounce rate doesn’t mean your visitors are happily engaged with your content either.
You website may have low Bounce Rate, high Pageviews, but very low conversion rate. This usually happens when your visitors may have difficulty finding what they are looking for in your site, even after searching for them and leaving your site unfulfilled.
Bounce Rate Vs. Exit Rate
Bounce Rate refers to the % of single-page visits to overall page visits while Exit Rate, also known as % Exit, is the % of exits that occur on your site.
A visitor who lands on one of your web pages is considered for Bounce Rate as well for Exit Rate for your website. On the other hand, a visitor who lands on one of your web pages and continues to browse through other web pages or blog posts is considered only for your Exit Rate.
So How Do You Improve Your Bounce Rate?
#1: Add more pages on your website and link back to the main page. Create more relevant posts on similar topics to the original landing page. Once these pages are created, insert links throughout the content (not more than 2-3 URLs) that leads your visitors back to the main landing page you want them to see.
Also, you can include a small text right after the posts like a “if you liked this, you may want to check this out” kind of way.
#2: Include other pages that guide and inform your visitors. Remember, not all of your visitors want to buy product from you right away.
A lot of them may want to learn more about it first. So, instead of just having sales copy, you may also want to include some links such as product manual, how to use guides, product review pages, and customer testimonials.
These additional pages will keep the visitor longer on your site and hopefully push them through the sales funnel to increase conversions.
#3: Add links on your sidebar too. A website includes a fixed sidebar section which is displayed throughout the site. Your visitors may land on any web page on your website. They many not even know anything about you. You can have “About Me/Us,” “Services,” “Products,” “Blogs,” and “Contact Us,” links inside this sidebar block.
In addition, you can also link to a page called “Start from here” for new visitors. Or try including “Most Popular Sections,” or “Top Comments” – all of which will drive people deeper into your site.
#4: Keep improving your content. If you find that a particular page on your site has high Bounce Rate as well as low average time on site (people leaving quickly), then you might want to review your content as it may not be answering important questions that your visitors may be looking for.
Offer more useful information to your visitors. Try to answer more questions they may have around the main topics. This will at least convince your visitors to stay for few more minutes.
Include videos, sign up newsletter sections, and social media links to build trust.
If you were interested to lower your bounce rate on your website and thus make your visitors stay longer on your website, then [contact us] for a free bounce rate evaluation (no obligation) for free
Having a good-looking and beautiful website design is just a part of online success. Without a decent amount of website traffic on a consistent basis, your website will not perform better.
So no matter what you are running – a blog, an e-commerce website, or a corporate website – you can utilize Google Keyword Planner Tool to research keywords that will attract quality traffic to your website and increase online conversion.
You can use new Google Keyword Planner Tool to dig out list of profitable keywords that will most likely profit your PPC ad campaign as well as come up with blog idea topics that you may have never thought about before.
Before we give you a step-by-step guide on how to use Google Keyword Planner Tool, let us explain the difference between the old and the new keyword research tool.
Google Keyword Tool vs. New Google Keyword Planner Tool
1. Unlike old Google Keyword Tool, you access Google Keyword Planner tool through your Google adwords account. Although the interface is slightly different and focused for advertisers, you do not have to advertise to use it.
2. By default, the results on Google Keyword Tool were ‘broad match’ and if you wanted to change this, you could select either ‘phrase match’ or ‘exact match.’ In Google keyword planner, however, the results are shown as ‘exact matches’ for keywords you type during your search.
3. In the past, you could tell Google to display closely related search phrases to the keywords you type. In the new Google Keyword Planner tool, however, this is no longer an option. Rumor has it that they’re bringing this feature back in the new tool again.
Here is step-by-step guide on how to use Google free Keyword Tool:
First of all, sign in to your Google Adwords account. Once you’re logged in, click on the “Tools and Analysis” menu at the top and click on the “Keyword Planner” drop down menu.
You will be presented to 3 different options.
#1: Search for keyword and adgroup ideas – If you want to perform a normal keyword research, use this option. Just enter keywords and Google will display you a list of keywords based on that search term(s).
Here are sub-sections of this option.
a) Your product or service – You enter the keyword you want to research. If there are more than one keyword, separate keywords using comma.
b) Your landing page – If you’re performing keyword research, you leave this field blank. This is the field where you run advertisements and start to bring visitors to your landing page. Google will later look at this page and suggest you keywords that could be closely matching to your ad campaign.
c) Your product category – If you need to find a category that closely match your keyword(s), use this option. With this option, Google will be able to find more relevant keywords once it figures out which category they belong to.
#2: Enter or upload keywords to see how they perform – You can also type a list of keywords or upload a file with keyword list and get details of ads you could run using those keywords. You will get ad info such as cost-per-click, estimated clicks, etc.
You are also given two options – Get estimates and Get search volume. Estimates tells you how much will it cost to use those keywords in your ad campaign.
#3: Multiple keyword lists – Select this option to get a list of combination of keyword suggestion to use in your sales copy, blog articles, and PPC ads. You are allowed to enter keywords in two list – list 1 and list 2 – and Google will come up with combine these two keywords and come up with new set of keyword list that you can use and target in your ad campaign.
Do you use Google Keyword Planner Tool to find good keyword phrases for your business? Do you know how to find ‘profitable’ keyword list for your niche? We can help!
Let GetYourSiteRanked.com find the most popular keyword list for your business to get immediate ranking on Google, Yahoo, and Bing.
[Click here] to get a FREE Keyword Analysis service for your site.
https://getyoursiterank.com/wp-content/uploads/2015/02/Step-by-Step-Guide-on-How-to-Use-Google-Keyword-Planner-Tool.jpeg225225Online Ionhttps://getyoursiterank.com/wp-content/uploads/2016/09/logo.pngOnline Ion2015-02-25 13:05:102016-07-02 09:25:38Step-by-Step Guide on How to Use Google Keyword Planner Tool
Google Keyword Tool is a great everyday engine for every entrepreneur dealing with Google AdWords. Google Keyword Tool is actually analyzing relevancy of search keywords, brands and categories, which makes it very helpful for every online business. Recently, Google Keyword Tool has experienced some changes, having been transformed by combining Keyword Tool with Traffic Estimator, into creating new tool – Google Keyword Planner. Is Google Keyword Planner a better solution, and if so, why?
Google Keyword Tool Vs. Google Keyword Planner
In Keyword tool you could only select one country, while in new version, i.e. Google Keyword planner, you don’t have to limit your choice to just one country, instead you have multiple countries choice available. However, Keyword Planner has got a language filter, completely excluding foreign terms, unlike its previous version, which might kick out search terms of companies named in their native language, so online market would have to adjust. Also, in Google Keyword Planner, end devices are dropped, while in Tool we had end devices possible. Another change you might notice regarding match-types, where search query is not possible for wide word group, but is limited to only one possible for exact match-type in search volume. Also the number of search volume keywords has been increased from 200 to 1000 keywords, but in Keyword Planner you can only insert 50 keywords of your choice, instead of 200 in its previous version. Some of the advantages you will notice in Google Keyword Planner is that you can now also add a region, besides from adding multiple countries, while this feature was unavailable in Keywords Tool where you could add only one country with no regions allowed. Another plus which you can get with Google Planner is getting your keywords research a lot easier with new keywords limit of 1.000, and new interface seems to be more manageable and slicker. On the other hand, Google Keyword Planner has some disadvantages regarding filter options where you can only place your search terms by exact instead of using phrases and broad searches. Also, if you choose your keywords search language to be French, English words will be automatically excluded.
Google Keyword Planner review
Google Keyword Planner is new bold combination of Traffic Estimator and Keyword Tool, allowing you to wrap and combine keywords, although it doesn’t actually allows you usage of multiple languages in your search terms, Google Keyword planner is getting the most out of every search by merging two types of research tools. You can also use feature that makes possible choosing more than just one country for your search terms, going in details where you can even choose a specific region. You can use up to 1.000 keywords for your search terms, which could increase the efficiency of keywords research, so this option is far better than the one used in its previous research. Interface design is now improved having managing Google Keyword Planner a lot easier. However, the highlight disadvantage of Google Keyword Planner reflects in broad keyword researches which are no longer available. Instead of using phrases and broad keyword suggestions and searches for increased trafficking, now you need to use the exact matches, which importantly decreases positive effects of your traffic keywords researching. Although this may seem as a small flaw, Google could have probably avoid to miss on negatively changing this important feature.
https://getyoursiterank.com/wp-content/uploads/2015/02/Update-–-Google-Keyword-Tool-changes-to-Google-Keyword-Planner..jpg190289Online Ionhttps://getyoursiterank.com/wp-content/uploads/2016/09/logo.pngOnline Ion2015-02-23 15:18:542016-07-02 09:36:07Update – Google Keyword Tool changes to Google Keyword Planner.
In any web marketing, Google Analytics acts as a powerful traffic reporting system that provides you helpful insight on how your visitors find your website and how they behave once they get inside. In this guide, we’ll show you how to setup Google Analytics tool on your website in a easy-to-follow steps.
Google Analytics Step by Step Basic Setup Guide
1. Create a New Gmail Account
Like other Google products, web metrics like Google Analytics starts from Gmail.com. Even though you already have a current Gmail account, it is still wise to setup a separate account while setting up Google Analytics. With a separate Gmail account, you will keep both your personal as well as business things separate and avoid them having mixed up too.
2. Sign in to GA
Once you’ve setup a new Gmail account, sign in and type “Google Analytics” on Google search. A link appears on the first page, probably on the first position. Click the link to enter Google Analytics.
You simply click the “Sign up” button and once it is done, you will be directed to a page where you will fill information about your website and region.
3. Create a Google Analytics account
It’s always helpful to give a domain name for analytics account. This way, it will be extremely easier to navigate around when you have more than one GA accounts. Once you’re done, simply click “Continue” and you’re done.
4. Personal and Regional Information
Once you’ve given the name for GA, your next step would be to fill up your personal as well as regional information in the next page. Once you’ve filled up this information, simply click on “Continue” button.
The page is the license agreement page. Read the license agreement and click the box “Yes, I agree to the terms and conditions” to create a new account.
5. Tracking Website
After you have created your account, you will be taken to the next page – i.e. the “Tracking Instruction” page. Through the advance tab, you can specify what you want to track: is your site hosted on a single domain, or do you have a site with multiple sub-domains or on multiple top-level domains, or your site is just aimed at mobile users.
Adwords settings can be edited later and isn’t important to for Analytics to function properly. Leave it for now.
If your website is dynamic, then you can tick the ‘I want to track dynamic content,’ especially if your website if written in PHP.
<HTML>
<HEAD>
<TITLE>Page Title</TITLE>
</HEAD>
<BODY>
Page content
>>>Paste your Google Analytics code HERE<<<
</BODY>
</HTML>
Once you use this code in your site, you can save the setting and close it by clicking on “Save and Finish” button.
Google Analytics account is now set up. Remember that you need to paste the tracking code on every web page you want to track. If you are using a template, you can simply paste the code inside the <HEAD> tags, which is more manageable as you only require pasting it once.
After 24 hours, the first data about your website will start to appear on the Google Analytics dashboard. Within a month, you will have gathered sufficient information to know a lot about your visitors and their behavior on your website.
 Call Us today! +65 6315 1570